Getting Started With twinleaf-rust
Installing twinleaf-rust
First, ensure that Rust is installed on your device. To check the current versions of this software, use the commands:
rustc --version

rustup --version

cargo --version
If you are missing any of these packages, please visit the Rust page and follow all directions to install: Install Rust. After installing, restart your computer and check the versions of rustc, rustup, and cargo to ensure that PATH environment variables were configured correctly.
Then, install (or upgrade) Twinleaf's Rust package using the command:
cargo install twinleaf-tools
If you would like the ability to convert large log files to HDF5, install using the command:
cargo install twinleaf-tools --features hdf5
Once you have installed twinleaf-tools, there are several programs to help you communicate with your device.
tio-proxy
The proxy makes a device attached via serial port available via Ethernet. A proxy server also allows users to utilize multiple functions of the Rust tools at once (i.e. running the monitor while logging data). The following will automatically scan for a twinleaf serial device:
tio-proxy --auto
When there is more than one serial port available, it is necessary to specify the port using:
MacOS: tio-proxy /dev/cu.usbmodemXXXXXX or tio-proxy /dev/cu.usbserialXXXXXX


Windows: tio-proxy COM3


Linux: tio-proxy /dev/ttyACM0
It might also be necessary to specify additional serial subtrees to connect directly to a sensor control unit. Additional specifications can be found in the user manual of your specific device.
tio-tool --help
To explore the full capabilities of the Twinleaf Rust tools, type 'tio-tool --help' into the terminal. A full list of commands will appear. This page will detail how to use the most popular commands.
Livestream Data and Graph in Command Line with tio-monitor
To monitor the device data, use the command
tio-monitor
If a thread 'main' panicked error appears and the sensor is connected via USB, double check that your proxy is connected.
If you are running a sensor and see only the streaming data for a HUB device, it is necessary to specify an additional subtree. For example,
tio-monitor -s/0
These commands only work if the sensor is already connected to your machine. An example display is shown below. To stop the display, use Ctrl-C or Command-C
● PPMV  Serial: PPMV.00023

Scalar magnetic field            52372.9214 nT

Vector magnetic field X          31695.5149 nT

Vector magnetic field Y          52257.1745 nT

Vector magnetic field Z         -28478.5591 nT

Vector coil X calibration         9508.1094 nT

Vector coil Y calibration         5342.8159 nT

Vector coil Z calibration         8008.0630 nT

Vector coil YX calibration        -221.1372 nT

Vector coil ZX calibration         829.2239 nT

Vector coil ZY calibration        3725.2729 nT

Status                                    5

Signal amplitude                     1.1299  V
tio-monitor also has additional controls at the bottom of the window that allows for real time graphing in command line. Scroll using the up and down arrows on the data streams and press Enter. A graph should appear next to the streams. Expand the window if you do not see this graph. Once graphing is enabled, continue using the up and down arrows to navigate between streams.
Communication with tio-tool rpc
tio-tool rpc provides a way to set different values related to your device. To start, type the following into the command line:
tio-tool rpc-list
This will output a full list of settings on the device that can be read and changed.
To read the current setting, while proxied into the device, type in command line:
tio-tool rpc (name of rpc)
For example:
tio-tool rpc field.data.decimation

Reply: 1

OK
If you wish to issue an rpc and change a setting, run:
tio-tool rpc (name of rpc) (new value)
For example:
tio-tool rpc field.data.decimation 10

Reply: 10

OK
Device settings will automatically save after 60 seconds, but if you wish to ensure that the new settings save, use the command tio-tool rpc dev.conf.save
Logging Data
Once you are proxied into a device, it is possible to log data from that device and any attached HUB.
To log data to a raw binary file:
tio-tool log
Terminate the logging process by using Ctrl-C or Command-C. A file should appear the same path as where the logging took place in the terminal that has this format: log.yearmonthday-XXXXXX.tio
Then, to parse the data to a .csv, use the command:
tio-tool log-csv [streamID or stream name] log.yearmonthday-XXXXXX.tio
This command will assume the root route unless otherwise specified. If you wish to specify a specific route, for example, if you are logging data from a PPM and do not need the data from the HUB, there are two options. The first is to configure the proxy to only be connected to the sensor via tio-proxy /dev/cu.usbmodemXXXX -s/0 or to have the proxy connected to the HUB and the sensor via tio-proxy /dev/cu.usbmodemXXXX and specify the route in the log command.
tio-tool log-csv 1 log.yearmonthday-XXXXXX.tio -s/0

tio-tool log-csv field log.yearmothday-XXXXXX.tio -s/0
This will create a .csv file with the data streams from that streamID / stream name and sensor. Each sensor will have different streams associated with their streamIDs. Please see the specifications for your sensor for more details.
Note: In order to properly create the .csv file, the log-csv command needs to be run in the same location as the log.tio file, or the full path for the log.tio file needs to be supplied to the log-csv command.
Troubleshooting
Linux
Installation Errors:
The serialport library depends on libudev that is not included on certain Linux distributions. To install, use:
sudo apt install libudev-dev # debian linux
It might also be necessary to install libssl-dev
sudo apt install build-essential libssl-dev
Other Errors:
-
If you run into any command not found errors on Linux, try to log out of your account and log back in.
-
Linux will attempt to connect with the sensor to determine if it is a modem. On systemd systems like Ubuntu, disable ModemManager using
sudo apt remove modemmanager. To access serial ports without superuser access usesudo usermod -a -G dialout $USERand on WSL you may needsudo usermod -a -G tty $USER.
Windows
Installation Errors: It will be necessary to manually configure the PATH environment variable. Add ...\.cargo\bin to your PATH environment variable, then restart your terminal.
Other Errors:
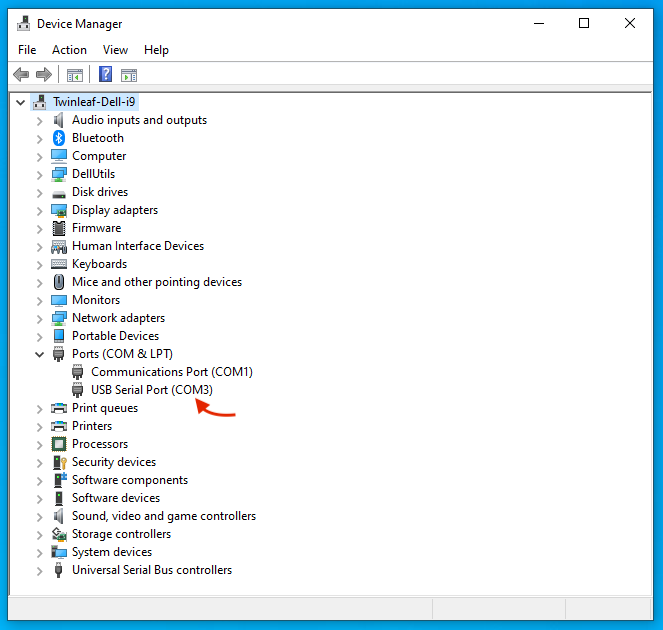
- Finding COM Number. Once you have plugged your device into your computer via USB, you will need to find the COM number specific to your connection setup. To do this, visit Device Manager and then Ports on your computer. Under Ports, you should see a USB Serial Port listed. Next to the listing should be a COM number in parentheses. See the screenshot below for reference (in our setup, it was
COM3).
-
The serial-USB adapter uses FTDI drivers that may not be installed by default.
-
If your mouse pointer goes crazy: If a windows computer is rebooted with a sensor plugged in, it can sometimes determine that the sensor is a serial mouse. It is possible to disable this in the registry.
-
If you run into an error installing packages on Windows, you may need to enable long paths.
If you have any questions or bugs you would like to report, please email contact@twinleaf.com so we can assist you.